728x90
1.방화벽 disable
systemctl stop firewalld
systemctl disable firewalld
sed -i 's/SELINUX=enforcing/SELINUX=disabled/g' /etc/sysconfig/selinux
cat /etc/sysconfig/selinux
reboot
2.필요 패키지 설치
yum install dhcp tftp-server httpd syslinux xinetd tftp3.dhcp 설정
vi /etc/dhcp/dhcpd.conf 수정
ddns-update-style interim;
ignore client-updates;
authoritative;
allow booting;
allow bootp;
allow-unknown-clients;
#internal subnet
subnet 192.168.208.0 netmask 255.255.240.0 {
range 192.168.212.20 192.168.212.40;
option routers 192.168.208.1;
default-lease-time 3600;
max-lease-time 7200;

##PXE Server IP
next-server 192.168.212.100;
filename "pxelinux.0";
}
subnet: DHCP 클라이언트 IP 대역
range: DHCP 클라이언트 IP 할당 범위
option domain-name-servers: DNS 서버 IP
option domain-name: DNS 도메인 이름
option routers: 기본 게이트웨이 IP
default-lease-time: IP 할당 시간 (초)
max-lease-time: 최대 IP 할당 시간 (초)
next-server: TFTP 서버 IP
filename: 클라이언트가 받을 부트 이미지 파일
systemctl start dhcpd
systemctl enable dhcpd
4.tftp 설정
vi /etc/xinetd.d/tftp 수정
disable = no 변경
service tftp
{
        socket_type             = dgram
        protocol                = udp
        wait                    = yes
        user                    = root
        server                  = /usr/sbin/in.tftpd
        server_args             = -s /var/lib/tftpboot
        disable                 = no
        per_source              = 11
        cps                     = 100 2
        flags                   = IPv4
}
systemctl start xinetd
systemctl enable xinetd
systemctl start tftp
systemctl enable tftp
5.OS 이미지 mount
ISO 파일 mount 또는 html 경로의 ISO 파일 복사해 됨
cd /home
mkdir -p /var/www/html/ISO/Centos7
mkdir -p /var/www/html/ISO/clonezilla
ll /var/www/html/ISO
mount -t iso9660 -o loop CentOS-7-x86_64-DVD-2009.iso /var/www/html/ISO/Centos7
mount -t iso9660 -o loop clonezilla-live-3.1.0-22-amd64.iso /var/www/html/ISO/clonezilla
df -h
6.http 재시작 및 확인
systemctl restart httpd
systemctl enable httpd
웹확인
http://192.168.212.100/ISO/

7.pxe 부트 이미지 복사
mkdir -p /var/lib/tftpboot/centos7
mkdir -p /var/lib/tftpboot/clonezilla
cd /var/lib/tftpboot/centos7
cp /var/www/html/ISO/Centos7/images/pxeboot/initrd.img ./
cp /var/www/html/ISO/Centos7/images/pxeboot/vmlinuz ./
cd ..
cd clonezilla
cp /var/www/html/ISO/clonezilla/live/initrd.img ./
cp /var/www/html/ISO/clonezilla/live/vmlinuz ./
cd ..
cp /usr/share/syslinux/pxelinux.0 /var/lib/tftpboot/
cp /usr/share/syslinux/menu.c32 /var/lib/tftpboot/
cp /usr/share/syslinux/chain.c32 /var/lib/tftpboot/
cp /usr/share/syslinux/mboot.c32 /var/lib/tftpboot/
cp /usr/share/syslinux/memdisk /var/lib/tftpboot/
ls
8.tftpboot 755 권한 적용
chmod 755 /var/lib/tftpboot
9.pxe 부팅 menu 생성(centos7,clonezilla)
mkdir /var/lib/tftpboot/pxelinux.cfg
vi /var/lib/tftpboot/pxelinux.cfg/default 생성 후 수정
default menu.c32
prompt 0
timeout 300
ONTIMEOUT local
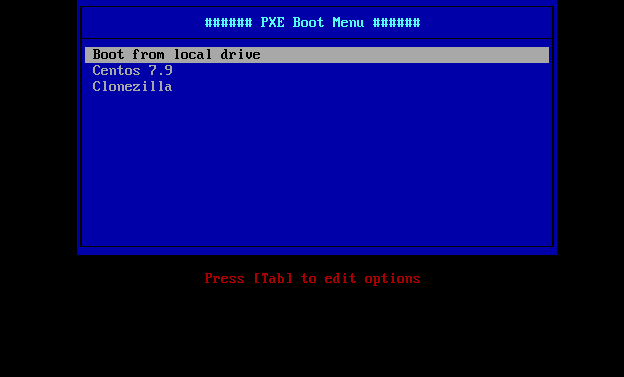
menu title ###### PXE Boot Menu ######
label Boot from local drive
localboot 0
label Centos 7.9
kernel centos7/vmlinuz
append initrd=centos7/initrd.img inst.repo=http://192.168.212.100/ISO/centos7
label Clonezilla
KERNEL clonezilla/vmlinuz
APPEND initrd=clonezilla/initrd.img boot=live config noswap nolocales edd=on nomodeset ocs_live_run="ocs-live-general" ocs_live_extra_param="" ocs_live_keymap="NONE" ocs_live_batch="no" ocs_lang="en_US.UTF-8" vga=788 nosplash noprompt ocs_prerun="" fetch=http://192.168.212.100/clonezilla/live/filesystem.squashfs
chmod 775 /var/lib/tftpboot/pxelinux.cfg/default
systemctl restart tftp
10. client PXE 부팅
728x90
'IT > LINUX' 카테고리의 다른 글
| rocky8 Glusterfs 구성 (0) | 2023.11.07 |
|---|---|
| Centos7 LVM root 용량 증설 하는 방법 (0) | 2023.05.10 |
| Linux에서 NFS 서버를 설정하는 방법 (0) | 2023.05.03 |
| 서버 ping 체크 스크립트 (2) | 2023.04.20 |
| ubuntu timezone 변경 (0) | 2023.04.18 |